Embed SDK Embedded Design Editor tutorial
Learn how to build a focused Create Design to Edit Design flow with the Embedded Design Editor (EDE) using the Adobe Express Embed SDK.
Introduction
Welcome! In this hands-on tutorial, we'll build a small web application around the Embedded Design Editor (EDE)—Adobe's new focused, configurable design surface. Instead of launching the full Adobe Express editor, we'll wire up two purpose-built workflows:
- Create Design launches a curated Template Browser that flows straight into a focused editor. The user picks a template, previews it, remixes it in the new EDE experience, and saves/exports.
- Edit Design re-opens that saved design later, so the user can keep refining it—complete with print-ready output options.
What you'll learn
By completing this tutorial, you'll gain practical skills in:
- Launching the EDE Create Design workflow with
module.createDesign()and a curated Template Browser. - Configuring a focused editor with an experience variant (
print) and print-ready PDF output. - Handling the export result in the
onPublishcallback—capturing the document ID and a preview image. - Launching the EDE Edit Design workflow with
module.editDesign().
What you'll build
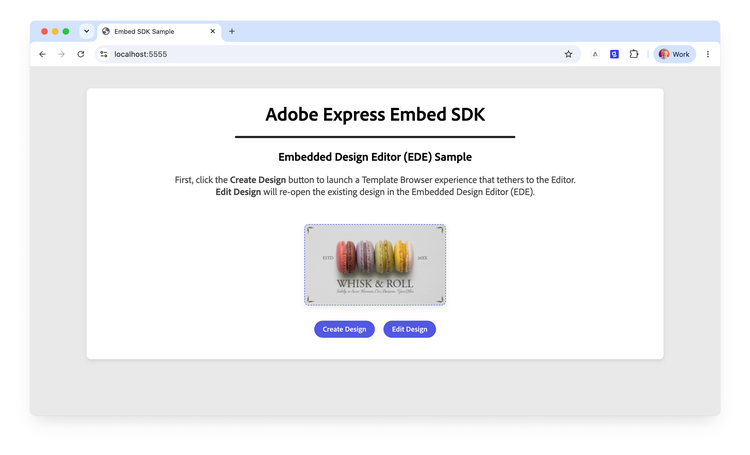
A single-page web app with a placeholder image and two buttons—Create Design and Edit Design. Create Design opens a print-oriented template browser tethered to the editor; saving brings the design's preview back into the page and unlocks Edit Design, which reopens the same document for further editing.
Prerequisites
data-variant=info
data-slots=text1
Additionally, make sure you have:
- An Adobe account: use your existing Adobe ID or create one for free.
- Embed SDK credentials (an API key) from the Adobe Developer Console; see the Quickstart Guide.
- Basic knowledge of HTML, CSS, and JavaScript.
- Node.js installed on your development machine.
- A text editor or IDE of your choice.
1. Run the sample project
Let's start from the finished result and work backwards into the code.
1.1 Clone the sample
Clone the embed-sdk-ede sample from GitHub and navigate to the project directory.
git clone https://github.com/AdobeDocs/embed-sdk-samples.git
cd embed-sdk-samples/code-samples/tutorials/embed-sdk-ede
data-variant=info
data-slots=text1
src folder with the simplest possible setup: HTML, JS, and CSS, one file each.1.2 Set up the API key
Locate the src/.env.example file, rename it to .env, and replace the placeholder string in VITE_API_KEY with your Embed SDK API Key:
VITE_API_KEY="your-api-key-here!"
data-variant=info
data-slots=text1
localhost:5555 domain and port.1.3 Install dependencies and run
Install the dependencies and start the development server:
npm install
npm run dev
The web application will be served at localhost:5555 on a secure HTTPS connection; HTTPS is always required for any Embed SDK integration. Open your browser and navigate to this address to see it in action.
Here's the flow you'll build:
-
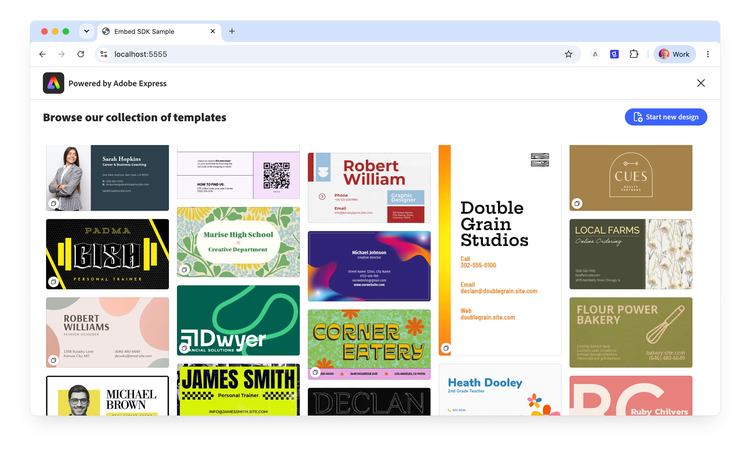
Click Create Design. A Template Browser opens with a curated collection of print templates.
-
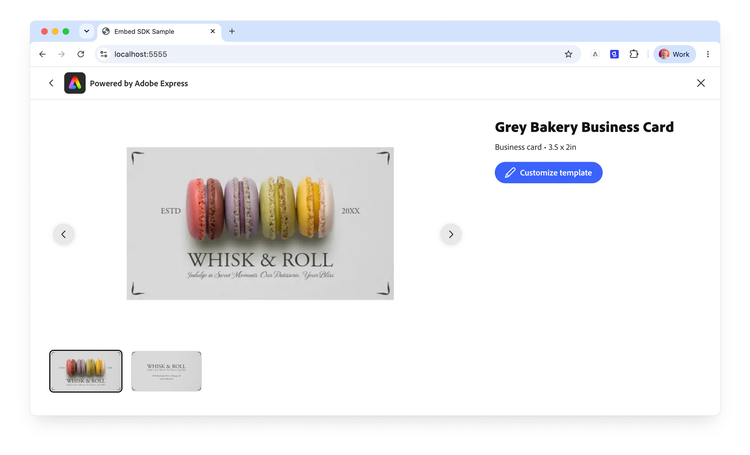
Pick one—you can preview it 1-up before committing.
-
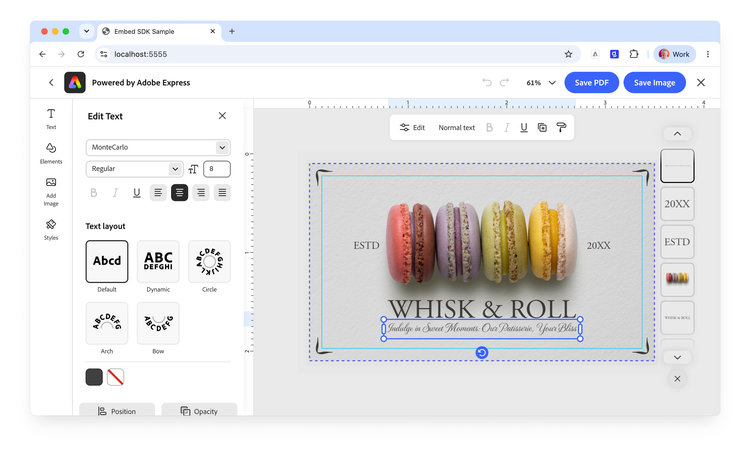
Customize the template in the EDE print-configured experience (with bleed, margins, and rulers on the canvas), then use the export buttons (Save PDF / Save Image) to save it.
-
The design's preview replaces the placeholder image on the page, and the Edit Design button—disabled until now—becomes enabled. Click Edit Design, and the same document re-opens in the editor, ready for further edits.
data-variant=error
data-slots=header, text1
Error: "Adobe Express is not available"
src/.env file as described here.2. Import and initialize the SDK
Open the project in your code editor of choice. The HTML is a simple Spectrum Web Components page (we'll list it in full at the end); let's focus on main.js.
At the top, we import the Spectrum styles and components used by the page, then the Embed SDK itself:
import "./style.css";

// Importing theme and typography styles from Spectrum Web Components
import "@spectrum-web-components/styles/typography.css";
import "@spectrum-web-components/theme/express/theme-light.js";
import "@spectrum-web-components/theme/express/scale-medium.js";
import "@spectrum-web-components/theme/sp-theme.js";

// Importing Spectrum Web Components
import "@spectrum-web-components/button/sp-button.js";
import "@spectrum-web-components/button-group/sp-button-group.js";
import "@spectrum-web-components/divider/sp-divider.js";

// Importing the Adobe Express Embed SDK
await import("https://cc-embed.adobe.com/sdk/v4/CCEverywhere.js");
console.log("CCEverywhere loaded", window.CCEverywhere);
data-variant=info
data-slots=text1
CCEverywhere.js; for more information, please refer to the Quickstart Guide. Note the await—the dynamic import() must complete before the global CCEverywhere object is available.Now we initialize the SDK. EDE experiences run as modules, so we destructure the module object from the initialize() call (unlike the Full Editor tutorial, which uses editor):
// Parameters for initializing the Adobe Express Embed SDK
const hostInfo = {
  clientId: import.meta.env.VITE_API_KEY,
  // The appName must match the Public App Name in the Developer Console
  appName: "Embed SDK Sample",
};

const configParams = { locale: "en-US" };

// Initializing the Adobe Express Embed SDK
const { module } = await window.CCEverywhere.initialize(hostInfo, configParams);
The hostInfo object is required: clientId holds your API Key (retrieved by Vite from the .env file) and appName must match the Public App Name in the Developer Console. The module object is the entry point for both EDE workflows—module.createDesign() and module.editDesign().
We'll also keep two small pieces of state at the top of the file: a reference to the placeholder <img>, and a variable to remember the saved document's ID (we'll see why in Section 4).
// Will hold the project ID when a document is saved on Adobe Express
let existingDocumentId = null;
const expressImage = document.getElementById("savedImage");
3. Launch Create Design
The Create Design workflow pairs a Template Browser with a focused editor: the user browses a curated collection, picks a starting point, and designs from it. We launch it with:
module.createDesign(
  appConfig?,    // what to browse + how the editor behaves
  exportConfig?, // the export/save buttons
  containerConfig?, // how the SDK iframe is presented
);
All three parameters are optional and positional—to skip one, pass undefined in its place. Let's build them up one at a time.
3.1 Configure the Template Browser
The heart of Create Design is contentBrowseConfig, which defines the Template Browser experience. Here we point it at a curated print collection, constrain it to business-card dimensions, and keep the UI focused:
const createDesignAppConfig = {
  contentBrowseConfig: {
    // The curated collection to browse
    categoriesConfig: [
      {
        category: "templates",
        rootCollectionId:
          "urn:aaid:sc:VA6C2:e21f90d3-cc15-4a43-8cfc-afb80f17c1a6", // 👈 your collection's URN
      },
    ],
    // Filter by page behavior, dimensions, and template type
    templateFilters: {
      behaviors: ["still"],
      dimensions: { width: 3.5, height: 2, unit: "in" },
      templateType: "business-card",
    },
    // Offer a "start from a blank canvas" option
    showCreateNew: true,
    // Title shown above the browser
    headerText: "Browse our collection of templates",
    // Keep the browser focused on the curated set
    hideSearchBar: true,
    hideFilters: true,
    disablePremiumContent: true,
  },
  // File types the user is allowed to publish
  allowedFileTypes: ["application/pdf", "image/jpeg", "image/png"],
  // Tailor the editor to a print workflow
  variant: "print", // 👈 or "default"
  callbacks, // 👈 defined in Section 4
};
A couple of properties of appConfig worth calling out:
variant: "print"tailors the focused editor to a print workflow—a print-oriented toolset with print-friendly defaults. See Experience variants for the full list; setting"default"gives a general-purpose editor instead.categoriesConfigpoints the browser at the collection you want users to design from. Swap in your own collection's URN.
data-variant=info
data-slots=text1
contentBrowseConfig is documented on the Template Browser concept page, which Create Design builds on.3.2 Configure export and container
The exportConfig array defines the save buttons the user sees in the editor. We offer two—one for a print-ready PDF, one for a PNG image—and both request a small base64 preview alongside the full-resolution asset (that preview is what we'll display on the page):
const sharedExportConfig = [
  {
    id: "save-asset-pdf",
    label: "Save PDF",
    action: {
      target: "publish",
      publishFileType: "application/pdf",
      outputType: "url", // the full-res PDF comes back as a URL
      subFileType: "pdfPrint",
      enableByDefault: true,
      previewConfig: {
        enabled: true,
        fileType: "image/png",
        outputType: "base64", // 👈 a small preview we can show inline
        scale: 0.25,
      },
    },
    style: { uiType: "button" },
  },
  {
    id: "save-asset-img",
    label: "Save Image",
    action: {
      target: "publish",
      publishFileType: "image/png",
      outputType: "blob", // the full-res PNG comes back as a blob
      enableByDefault: true,
      previewConfig: {
        enabled: true,
        fileType: "image/png",
        outputType: "base64", // 👈 same inline preview
        scale: 0.25,
      },
    },
    style: { uiType: "button" },
  },
];
The containerConfig controls how the SDK surface is presented. We'll let it fill the viewport:
const sharedContainerConfig = {
  mode: "fill", // 👈 or "inline", "modal"
  hideCloseButton: false,
};
Both objects are shared by Create Design and Edit Design—see Shared configuration for the full ExportConfig and ContainerConfig references.
3.3 Wire up the Create Design button
Finally, launch the workflow when the user clicks Create Design:
document.getElementById("createBtn").onclick = async () => {
  module.createDesign(
    createDesignAppConfig,
    sharedExportConfig,
    sharedContainerConfig,
  );
};
4. Handle the result
When the user saves, EDE behaves like any Embed SDK module: the onPublish callback fires with the export intent and a publishParams object. This is where the two halves of the flow connect. We need to:
- Remember the document so Edit Design can reopen it—
publishParams.documentId. - Show the preview on the page—
publishParams.assetPreview[0].datais the base64 string we requested inpreviewConfig. - Enable the Edit Design button.
- Return a publish status so Adobe Express knows the save was accepted.
const callbacks = {
  onCancel: () => {
    console.log("Process canceled");
  },
  onPublish: (intent, publishParams) => {
    // 1. Store the document ID for later editing
    existingDocumentId = publishParams.documentId; // 👈
    // 2. Show the returned base64 preview in place of the placeholder
    expressImage.src = publishParams.assetPreview[0].data; // 👈
    // 3. Enable the Edit Design button
    document.getElementById("editBtn").disabled = false; // 👈
    // 4. Always return a status object to confirm (or deny) the publish
    return { status: "SUCCESS" }; // 👈 or "DENIED"
  },
  onError: (err) => {
    console.error("Error!", err.toString());
  },
};
data-variant=info
data-slots=text1
publishParams carries both a full-resolution asset (the PDF URL or PNG blob you configured in exportConfig, under publishParams.asset) and the small base64 assetPreview. Here we only need the lightweight preview to update the page; you'd use asset to download or upload the final file. Note both are arrays—we take the first item.5. Reopen the design with Edit Design
The Edit Design workflow opens an existing document in a focused editor. Its signature adds a required first parameter, docConfig, that tells the editor which document to open:
module.editDesign(
  docConfig,     // required: which document to open
  appConfig?,
  exportConfig?,
  containerConfig?,
);
5.1 Configure the print editor
Unlike Create Design, Edit Design accepts explicit output controls. Because this is a print workflow, we turn on the on-canvas print guides and configure a print-ready PDF export:
const editDesignAppConfig = {
  variant: "print",

  // On-canvas print guides
  editorGuideConfig: {
    showBleed: true,
    showMargins: true,
    showRulers: true,
  },

  // Print-ready PDF output
  pdfPrintConfig: {
    includeCropMarks: true,
    includeBleed: true,
    colorMode: "cmyk",
    cmykColorProfile: "Coated GRACoL 2006 (ISO 12647-2:2004)",
  },

  allowedFileTypes: ["application/pdf", "image/jpeg", "image/png"],
  contentConfig: { hidePremiumContent: true },
  callbacks, // 👈 the same callbacks from Section 4
};
data-variant=info
data-slots=text1
editorGuideConfig and pdfPrintConfig are available to Edit Design but not to Create Design yet—Create Design falls back to sensible print defaults (CMYK, a standard coated ICC profile, and bleed). This asymmetry is explained in the Create Design → Output configuration today concept section.5.2 Wire up the Edit Design button
We pass the documentId we stored in onPublish as the docConfig.docId. That's what tells Adobe Express to reopen the exact document the user created:
document.getElementById("editBtn").onclick = async () => {
  const docConfig = { docId: existingDocumentId }; // 👈 the saved document
  module.editDesign(
    docConfig,
    editDesignAppConfig,
    sharedExportConfig,
    sharedContainerConfig,
  );
};
Because the Edit Design button starts out disabled and is only enabled inside onPublish, existingDocumentId is guaranteed to hold a real ID by the time this handler can run. Edit Design reuses the same onPublish callback, so saving again updates the preview just as before.
Troubleshooting
Common issues
src/.env file as described here.onPublish. Save a design at least once (Save PDF / Save Image) before Edit Design becomes available.existingDocumentId was set—log publishParams.documentId in onPublish to verify the save returned a document ID.Complete working example
The complete implementation demonstrates everything covered above. You can find it in the embed-sdk-ede sample, or below for reference.
data-slots=heading, code
data-repeat=2
data-languages=HTML, JavaScript
index.html
<!doctype html>
<html lang="en">
  <head>
    <meta charset="UTF-8" />
    <meta
      name="viewport"
      content="width=device-width, initial-scale=1.0"
    />
    <title>Embed SDK Sample</title>
  </head>

  <body>
    <sp-theme
      scale="medium"
      color="light"
      system="express"
    >
      <div class="container">
        <header>
          <h1>Adobe Express Embed SDK</h1>
          <sp-divider size="l"></sp-divider>
          <h2>Embedded Design Editor (EDE) Sample</h2>
          <p>
            First, click the <b>Create Design</b> button to launch a Template
            Browser experience that tethers to the Editor. <br />
            <b>Edit Design</b> will re-open the existing design in the Embedded
            Design Editor (EDE).
          </p>
        </header>

        <main>
          <img
            id="savedImage"
            src="https://placehold.co/300x300?text=Placeholder+Image&font=source-sans-pro"
            alt="Your design will appear here."
          />
          <sp-button-group>
            <sp-button id="createBtn">Create Design</sp-button>
            <sp-button
              id="editBtn"
              disabled
              >Edit Design</sp-button
            >
          </sp-button-group>
        </main>
      </div>
    </sp-theme>

    <script
      type="module"
      src="./main.js"
    ></script>
  </body>
</html>
main.js
import "./style.css";

// Importing theme and typography styles from Spectrum Web Components
import "@spectrum-web-components/styles/typography.css";
import "@spectrum-web-components/theme/express/theme-light.js";
import "@spectrum-web-components/theme/express/scale-medium.js";
import "@spectrum-web-components/theme/sp-theme.js";

// Importing Spectrum Web Components
import "@spectrum-web-components/button/sp-button.js";
import "@spectrum-web-components/button-group/sp-button-group.js";
import "@spectrum-web-components/divider/sp-divider.js";

// Importing the Adobe Express Embed SDK
await import("https://cc-embed.adobe.com/sdk/v4/CCEverywhere.js");
console.log("CCEverywhere loaded", window.CCEverywhere);

// Parameters for initializing the Adobe Express Embed SDK
const hostInfo = {
  clientId: import.meta.env.VITE_API_KEY,
  appName: "Embed SDK Sample",
};

const configParams = { locale: "en-US" };

// Initializing the Adobe Express Embed SDK
const { module } = await window.CCEverywhere.initialize(hostInfo, configParams);

// Will hold the project ID when a document is saved on Adobe Express
let existingDocumentId = null;
const expressImage = document.getElementById("savedImage");

// Callbacks used when creating or editing a document
const callbacks = {
  onCancel: () => {
    console.log("Process canceled");
  },
  onPublish: (intent, publishParams) => {
    existingDocumentId = publishParams.documentId;
    expressImage.src = publishParams.assetPreview[0].data;
    // enable the editDesign button
    document.getElementById("editBtn").disabled = false;
    // Always return a status object to indicate the result of the publish action
    return { status: "SUCCESS" }; // or "DENIED"
  },
  onError: (err) => {
    console.error("Error!", err.toString());
  },
};

// Create Design: browse a curated collection, then design in a focused editor
const createDesignAppConfig = {
  contentBrowseConfig: {
    categoriesConfig: [
      {
        category: "templates",
        rootCollectionId:
          "urn:aaid:sc:VA6C2:e21f90d3-cc15-4a43-8cfc-afb80f17c1a6",
      },
    ],
    templateFilters: {
      behaviors: ["still"],
      dimensions: { width: 3.5, height: 2, unit: "in" },
      templateType: "business-card",
    },
    showCreateNew: true,
    headerText: "Browse our collection of templates",
    hideSearchBar: true,
    hideFilters: true,
    disablePremiumContent: true,
  },
  allowedFileTypes: ["application/pdf", "image/jpeg", "image/png"],
  variant: "print", // or "default"
  callbacks,
};

// Edit Design: reopen an existing document with print output controls
const editDesignAppConfig = {
  variant: "print",
  editorGuideConfig: {
    showBleed: true,
    showMargins: true,
    showRulers: true,
  },
  pdfPrintConfig: {
    includeCropMarks: true,
    includeBleed: true,
    colorMode: "cmyk",
    cmykColorProfile: "Coated GRACoL 2006 (ISO 12647-2:2004)",
  },
  allowedFileTypes: ["application/pdf", "image/jpeg", "image/png"],
  contentConfig: { hidePremiumContent: true },
  callbacks,
};

// Shared export buttons (used by both workflows)
const sharedExportConfig = [
  {
    id: "save-asset-pdf",
    label: "Save PDF",
    action: {
      target: "publish",
      publishFileType: "application/pdf",
      outputType: "url",
      subFileType: "pdfPrint",
      enableByDefault: true,
      previewConfig: {
        enabled: true,
        fileType: "image/png",
        outputType: "base64",
        scale: 0.25,
      },
    },
    style: { uiType: "button" },
  },
  {
    id: "save-asset-img",
    label: "Save Image",
    action: {
      target: "publish",
      publishFileType: "image/png",
      outputType: "blob",
      enableByDefault: true,
      previewConfig: {
        enabled: true,
        fileType: "image/png",
        outputType: "base64",
        scale: 0.25,
      },
    },
    style: { uiType: "button" },
  },
];

// Shared container (how the SDK surface is presented)
const sharedContainerConfig = {
  mode: "fill", // or "inline", "modal"
  hideCloseButton: false,
};

// Click handler for the Create Design button
document.getElementById("createBtn").onclick = async () => {
  module.createDesign(
    createDesignAppConfig,
    sharedExportConfig,
    sharedContainerConfig,
  );
};

// Click handler for the Edit Design button
document.getElementById("editBtn").onclick = async () => {
  const docConfig = { docId: existingDocumentId };
  module.editDesign(
    docConfig,
    editDesignAppConfig,
    sharedExportConfig,
    sharedContainerConfig,
  );
};
Next steps
Congratulations! You've built an Embedded Design Editor integration that tethers a curated Template Browser to a focused, print-configured editor, and reopens saved designs with Edit Design. What's next?
- Try the
"default"variant, or pointcategoriesConfigat your own template collection. - Explore the full configuration surface in the Embedded Design Editor guide and the API Reference.
- Visit the changelog to keep up with EDE improvements—it's in active development.
- Before going live, submit your integration for approval; see Submission and Review.
Need help?
Have questions or running into issues? Join our Community Forum to get help and connect with other developers working with the Adobe Express Embed SDK.
Related resources
- Embedded Design Editor guide: the shared EDE concepts and configuration.
- Create Design: browse a template and design from it.
- Edit Design: open and refine an existing document, with output controls.
- Template Browser: the content-browsing experience Create Design builds on.
- Full Editor tutorial: the companion tutorial for the full Adobe Express editor.
- API Reference: complete SDK documentation.
- Changelog: latest updates and improvements.